Embedding HTML in Articles (Joomla 3)
Many times want to incorporate HTML code into an article, and the process is very similar when embedding HTML code into a Custom HTML module. Typically, this can done using just about any editor. This article offers step-by-step instructions for inserting HTML code using the JCE Editor, or the TinyMCE Editor which is the default editor that comes with your Joomla site.
Selecting a Default Editor
Embedding Code using the JCE Editor
Embedding Code using the TinyMCE Editor
Selecting a Default Editor
After logging into the Administration area, go to the Global Configuration settings for your site to determine which editor you're currently using as the default editor.
If you've already installed the JCE Editor, select it from the "Default Editor" drop down menu. CloudAccess.net recommends that you use the JCE Editor because it has a lot of features that many users prefer. Be sure to save your work.
The rest of this article contains two sets of instructions. The first is how to embed HTML code using the JCE Editor, and the second is how to embed the code using the TinyMCE Editor.
Back to Top
Embedding Code using the JCE Editor
First, go to the Article Manger and open the article that you'd like to work with or create a new article.
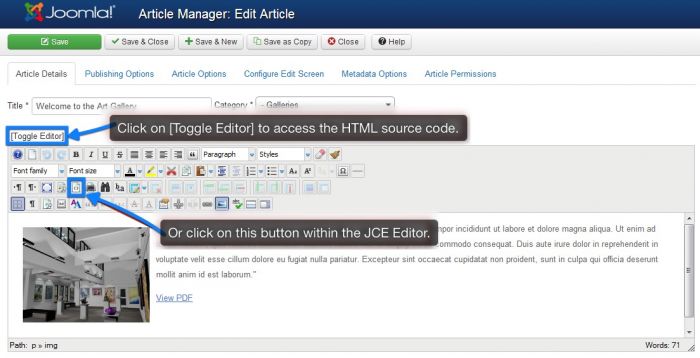
Once inside the article, you'll see the [Toggle Editor] link. This link will allow you to see the HTML source code. Inside the JCE Editor itself, there is also an icon to view the color HTML version of the editor. Please see the screenshot below to for both features.
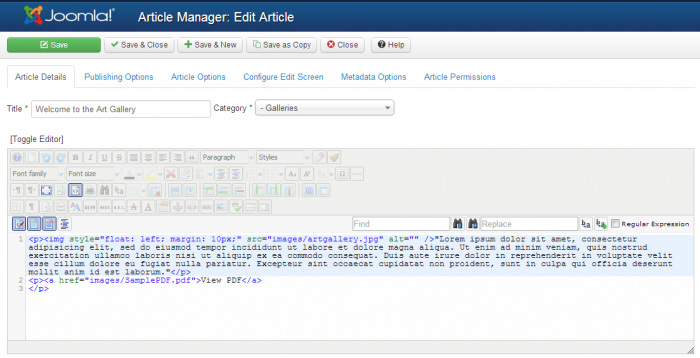
Below is a screenshot of the color version of the HTML source code using the JCE Editor function.
This is the area where you'll cut and paste or alter the HTML source code for your article. Once you're finished, you can close the source code view by selecting the same icon. Be sure to save your work, and you'll be all set.
Back to Top
Embedding Code using the TinyMCE Editor
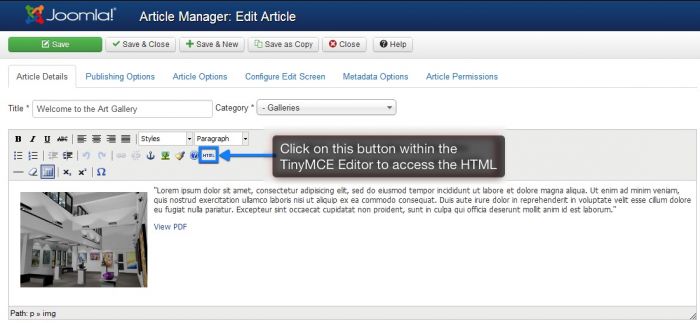
If you're using the TinyMCE Editor, the process is very similar. First, open the article you want to work with or create a new one. Once inside the article, in the TinyMCE Editor, locate the "HTML" icon.
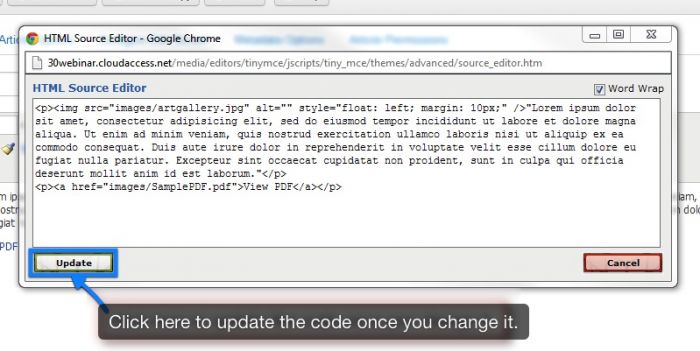
When you select the "HTML" icon, a new window will open for you to edit the HTML code. This is the area where you'll cut and paste or alter the HTML source code for your article. Be sure to update your work by selecting the "Update" button.
After you're done updating the code, save the article, and you'll be all set.
Back to Top

Do you have suggestions for improving this article?
We take a great deal of pride in our knowledgebase and making sure that our content is complete, accurate and useable. If you have a suggestion for improving anything in this content, please let us know by filling out this form. Be sure to include the link to the article that you'd like to see improved. Thank you!


